Airy Lamp Series by 24°

Kate James

‘airy’ by japanese firm 24° studio is a lamp series that uses japanese rice paper as a main ingredient. lamination on the surface prevents the material from tarnishing and tearing and gives it the benefit of being fire-retardant. a simple slot-in assembly is required to complete the kit, consisting of five- and six-sided panels with a finely cut perforation pattern that allows the end users to extrude each piece into a desired form. ‘while maintaining the characteristics of the rice paper that provide a soft diffused lighting effect, the geometrical pattern brings unique experience to the space when airy is lit,’ says the studio.


https://www.designboom.com/design/24d-studio-airy-lamp-series-japanese-rice-paper-01-22-2015/

LC shutters

Kate James

‘LC shutters’ by louise campbell for louis poulsen

Danish/english designer louise campbell has developed ‘LC shutters’ for UK-based lighting company louis poulsen. The pendant is meant to be simple and modern not only in its aesthetic but also in the manufacturing process. production has been cut down to three steps: turning the shade, stamping the pattern, and painting.
for the cutting of the pattern onto the lamp shade, a new tool was developed which can stamp with millimeter-precision along on a curved surface.

https://www.designboom.com/design/louise-campbell-lc-shutters-pendant-light-for-louis-poulsen/ 

Detaileed understanding of an LED circuit

Dina Chehab

LED with Pushbutton

Dina Chehab


Components and supplies

Breadboard (generic)

Resistor 1k ohm

Jumper wires (generic)

Arduino UNO

1 LED (generic)

1 pushbutton 


LED ON when button is pressed

arduino

LED is set to ON when the button is pressed.

1const int BUTTON = 2;
2const int LED = 3;
3int BUTTONstate = 0;
4
5void  setup()
6{
7  pinMode(BUTTON, INPUT);
8  pinMode(LED, OUTPUT);
9}
10
11void  loop()
12{
13  BUTTONstate = digitalRead(BUTTON);
14  if (BUTTONstate == HIGH)
15  {
16    digitalWrite(LED, HIGH);
17  } 
18  else{
19    digitalWrite(LED,  LOW);
20  }
21}

LED is OFF when button is pressed (Opposite effect)

arduino

LED is OFF when button is pressed (Opposite effect)

1const int BUTTON = 2;
2const int LED = 3;
3int BUTTONstate = 0;
4
5void  setup()
6{
7  pinMode(BUTTON, INPUT);
8  pinMode(LED, OUTPUT);
9}
10
11void  loop()
12{
13  BUTTONstate = digitalRead(BUTTON);
14  if (BUTTONstate == HIGH)
15  {
16    digitalWrite(LED, LOW);

Flex Sensor

Liam Brady

Flex sensors are resistance-based sensors that react to how much they get bent. The more they are bent, the larger the resistance across the sensor. The Arduino is able to measure the changing resistance to determine how much the sensor is bent.

void setup() {
  Serial.begin(9600);
}

void loop() {
  int val = analogRead(A0);

  Serial.println(val);
  delay(100);
}

PIR Motion Sensor

Liam Brady

PIR sensors (or passive infrared sensors) are motion sensors that measure subtle changes in infrared light in the room and register that change as movement. The processing is done on the chip and it outputs a current based on whether or not it detects motion.

int pin = 2;

void setup(){
  pinMode(pin, INPUT);

  pinMode(13, OUTPUT);
}

void loop(){
  int pirVal = digitalRead(pin);

  if (pirVal == 0) {
    digitalWrite(13, HIGH);
  } else {
    digitalWrite(13, LOW);
  }

  delay(100);
}

Infrared Distance Sensor

Liam Brady

Infrared distance sensors are sensors that measure how far away an object is by shooting infrared light at the object and measuring how much light is reflected back. They output an analog current which can be read by the Arduino.

void setup() {
  Serial.begin(9600);
}

void loop() {
  int val = analogRead(A0);

  Serial.println(val);

  delay(100);
}

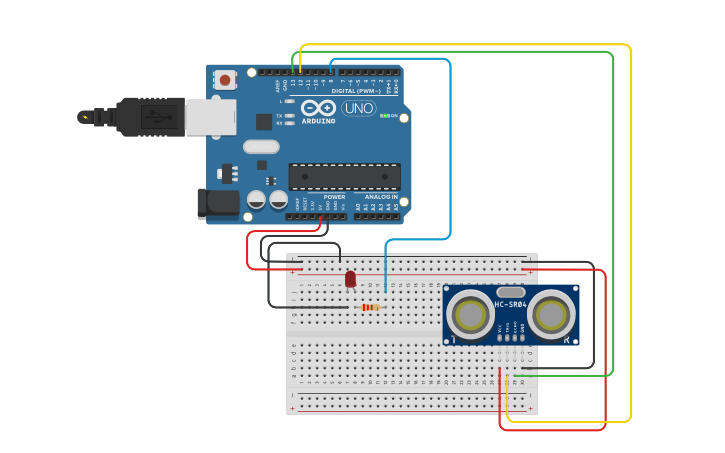
Ultrasonic Sensor with LED

Dina Chehab


int trigger = 12;

int echo = 13;

int led = 8;


long duration = 0;

int cm = 0;

int inch = 0;


void setup() {

  // put your setup code here, to run once:

  Serial.begin(9600);

  pinMode(trigger, OUTPUT);

  pinMode(echo, INPUT);

  pinMode(led, OUTPUT);

}


void loop() {

  // put your main code here, to run repeatedly:

  digitalWrite(trigger, LOW);

  digitalWrite(trigger, HIGH);

  digitalWrite(trigger, LOW);


  duration = pulseIn(echo, HIGH);

  cm = duration*0.034/2;

  inch = duration*0.0133/2;


  if (inch < 50){

    digitalWrite(led, HIGH);

  } else {

    digitalWrite(led, LOW);

  }


  if (inch < 100 ) {

    Serial.print("Inches: ");

    Serial.println(inch);

    Serial.print("Cm: ");

    Serial.println(cm);

  }

  delay(500);

}

Ultrasonic Sensor (Large)

Liam Brady

Ultrasonic sensors are distance sensors that use sound waves to detect how far away an object is. They send out high frequency bursts of sound and listen for its echo. They then determine how far away the object is based on how long it takes for the sound to return to the sensor. This variety requires an Arduino library to operate.


NewPing Library

#include <NewPing.h>

NewPing mysensor(5, 6, 200);

void setup() {
  Serial.begin(9600);
}

void loop() {
  int pingTime = mysensor.ping();

  int distance = mysensor.ping_in();

  int distance_cm = mysensor.ping_cm();

  Serial.println(distance);
}

Introduction To Arduino

Dina Chehab

Dynamic LED Circuits